• Inquiries
  • About
  • Travel With Me
  • Nav Social Menu

    • Bloglovin
    • LinkedIn
    • Pinterest
    • Twitter

Cotten Tales

  • MY GIRLS
    • DOROTHY
    • FRANCES
  • MOCO FIXER
  • STITCH FIX

Photo Gallery Tips | Things Pinterest Conveniently Left Out

DIY

3 Nov

I have been planning a photo gallery wall in my dining room since before we actually purchased our home. I didn’t have any idea what colors I wanted the walls (other than “not orange”), or where the furniture was going to live, but I most definitely knew a photo display was happening above my DIY buffet.

I had planned to have this project complete before Dorothy’s birthday party. How hard could it be, right? Hang some photos, throw in some decor, and BAM. Done.

Turns out it’s not exactly easy.

I tried different frame layouts on the floor for two hours before I gave up and recruited help. Pinterest actually failed me, however my (art major) husband had it down in five minutes. Not kidding. Something about the Golden Ratio or something…

Now that I’ve emerged on the other side, today I’m sharing my top five tips for creating your own gallery wall. As in, the things I wish Pinterest would have told me but conveniently left out. You’re welcome.


photogallerytips

1 | Plan
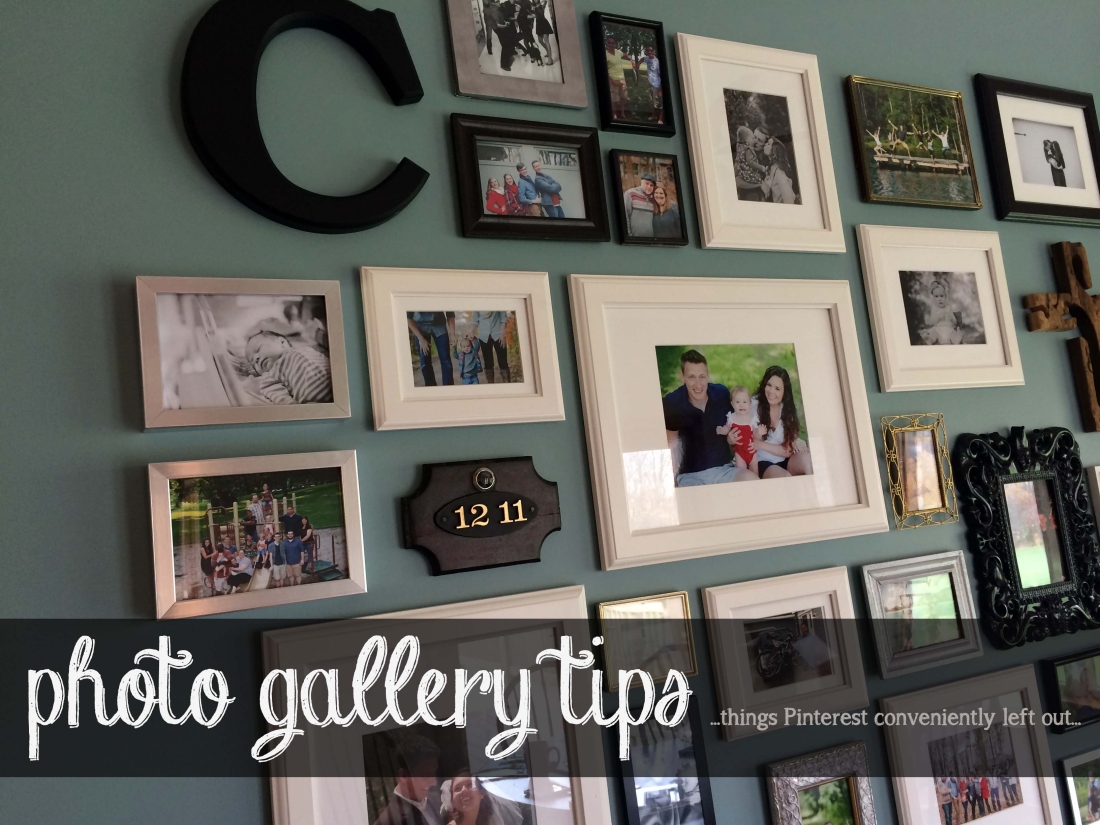
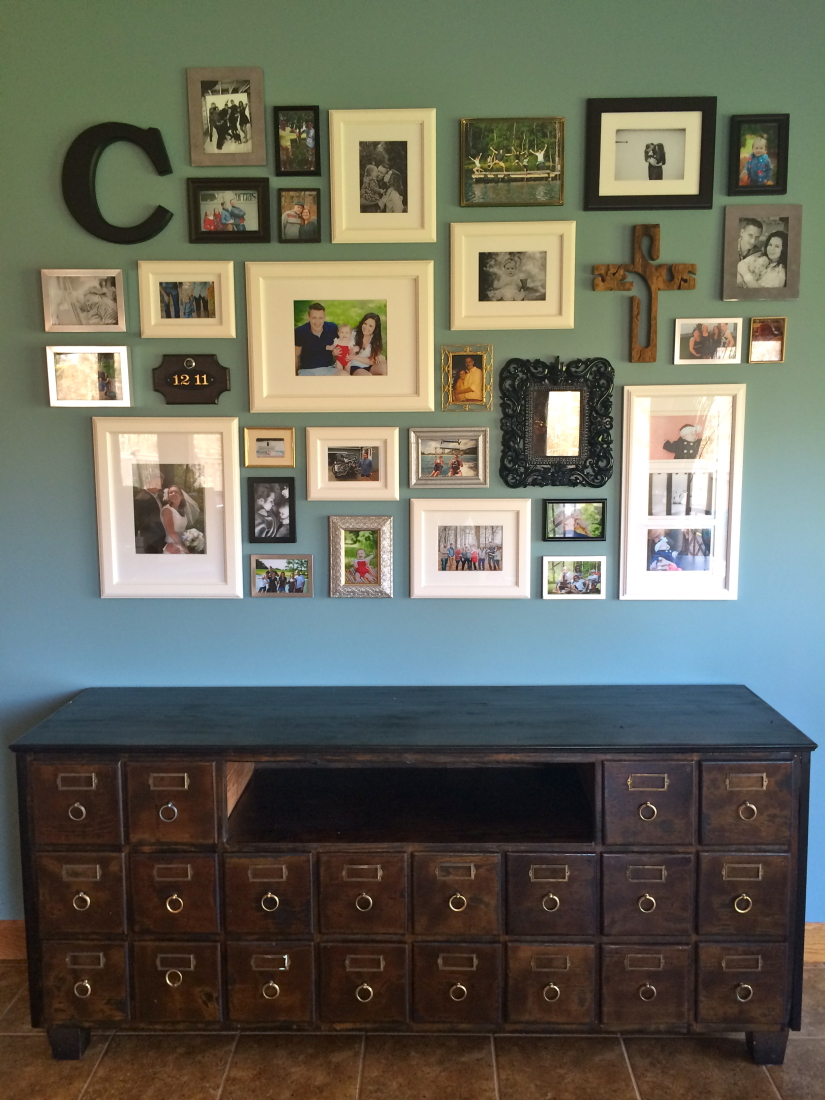
Before you do anything, decide on the look you want for your gallery wall. I went with a hodgepodge of old white, black and metallic frames that I had floating around the house, however you may prefer a more streamlined look with all black or all white frames. Maybe you want only black and white photos, or only frames that have mattes – whatever the case, make your decision BEFORE you get started. Changing your mind halfway through is way, way frustrating.

The same advice goes for adding in decor items. Have these pieces picked out in advance so that you know what shapes you need to work with in your layout.


2 | Layout

Don’t even THINK about hanging ANYTHING on the wall before you lay the whole concept out on the floor… about 30 times. Measure the area on the wall that you want your gallery to cover, and then tape off the same space on the floor. You may be able to use a pre-made layout idea to get the look you want, or you may have to play with it for a few days. In my case, I had to enlist my resident designer. Don’t do anything until you get the look you want.

In the same vein, be sure to consider what photos will actually go in the frames. You may not want two color photos next to each other. Or you may not have a ton of vertical photos to fill vertical frames. Or you may end up with a wall full of photos only taken by one photographer (see: Ardent Owl Photography).

Once you achieve your desired layout, take a photo. You will want a reference.
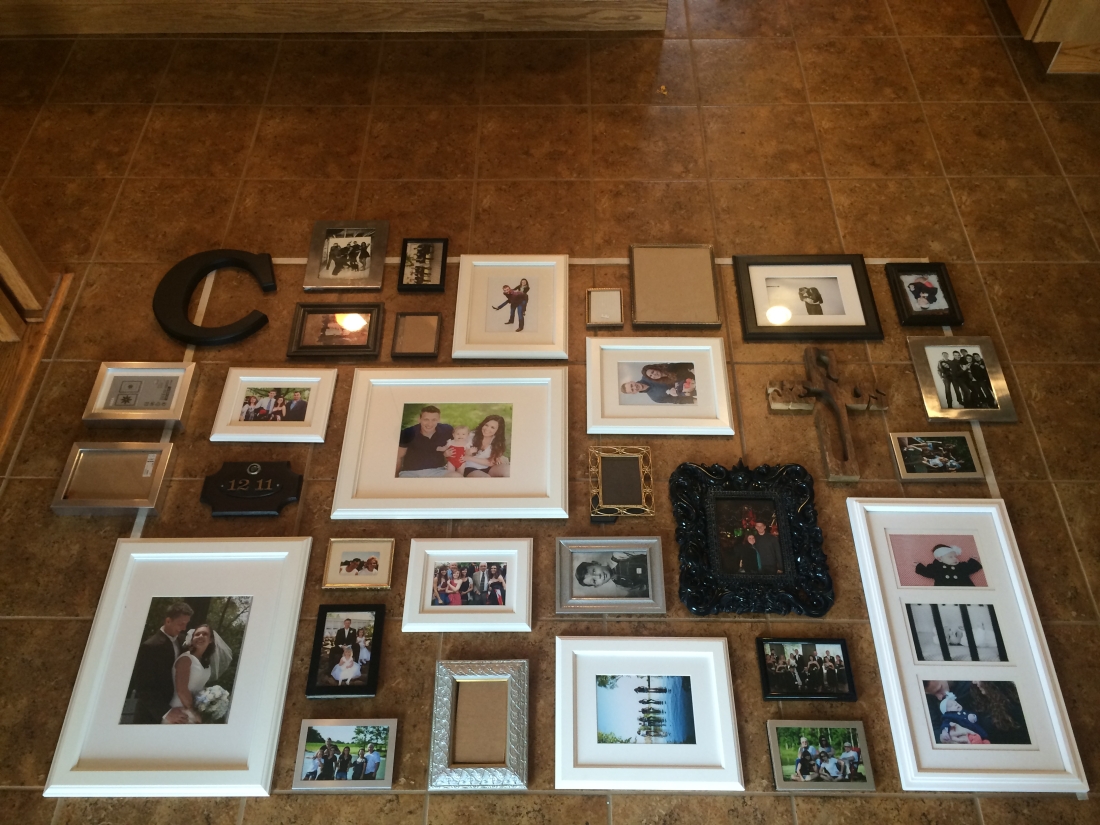
photo 1(18)

my reference photo


3 | Buy these

Getting the design correct on the floor is one thing, but transferring that to the wall using a hammer and nails is another. Insert 3M Command Picture Hanging Strips.

photo 2(15)

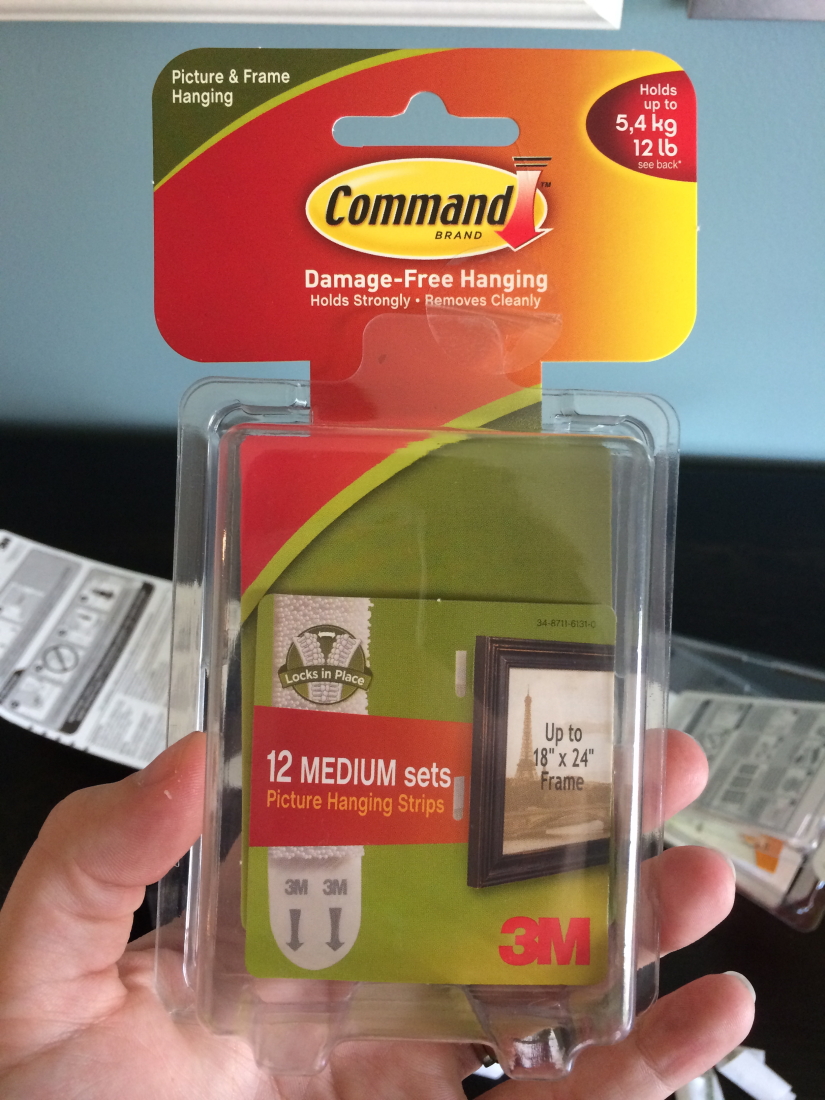
Seriously, these might be my best idea yet. They hold up to 12 lbs. (for my crazy heavy Disney frame), and the Velcro gave me a little wiggle room when my version of level was… not exactly level. Plus, I’m not worried about tearing up my newly painted wall (and when I want to change it, it will be much easier). Bonus.

*I wish 3M was paying me to sing their praises, but sadly they’re not.


4 | Speaking of level…

Hanging the first row is the hardest. I promise it gets better (same for like, marriage, childbirth and parenting). Since my layout called for the bottom of the first row to all match up, I used my level like crazy… at first.

photo 3(14)

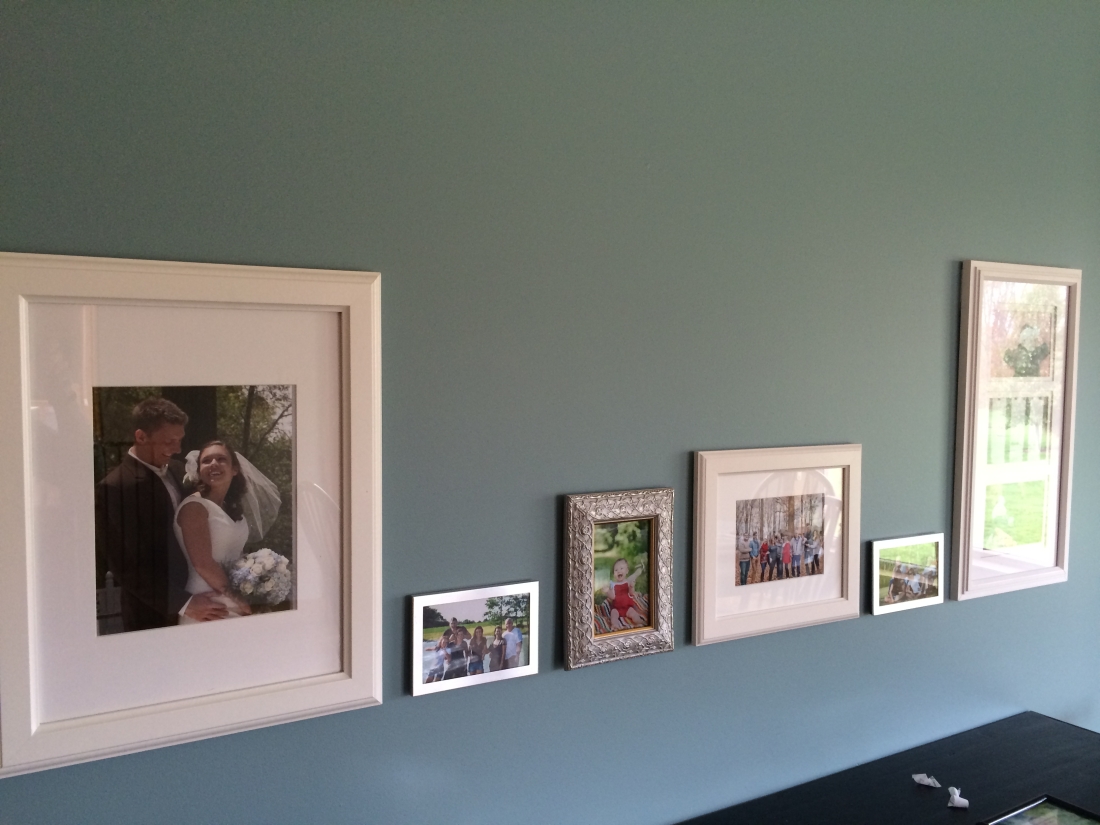
Once the first row was established, and deemed level, I was able to pretty easily eyeball the rest. I used my photo for reference, and double triple checked it before making the photo “permanent.” My organic design was more forgiving, but even a structured layout will get 100x easier once the first perfect row is set.


5 | Admire the beauty

Ta-da! Success. Give yourself a pat on the back. You freaking earned it.

photo(17)

Share this:

  • Click to share on Twitter (Opens in new window)
  • Click to share on Facebook (Opens in new window)

Related

1 Comment

Previous Post: « Holiday Bonanza | oh hey, friday
Next Post: Boogers | oh hey, friday »

Reader Interactions

Comments

  1. Jane says

    November 4, 2014 at 8:03 am

    Love it , thanks for the tips. I’m getting ready to finally tackle my stairwell with empty frames

    Reply

Leave a Reply Cancel reply

Your email address will not be published. Required fields are marked *

Primary Sidebar

Hey there, I'm Samantha. Recovering SAHM, and aspiring competitive dance mom. I have a passion for travel, am known to say it like it is, and I most certainly do not have it all together. Currently on a journey toward self love and discovery. Join me. 2021 | Bloom

Latest from Instagram

Definitely not over the @iddancecomp photos from l Definitely not over the @iddancecomp photos from last weekend. 💜🕺
Just like that, Biddy Ball is over. 😢 We’re S Just like that, Biddy Ball is over. 😢 We’re SO proud of Frances for trying something new, developing as a player each week, and even scoring her first basket in the last minute of her last game! 🏀 We’ll miss our Tuesday and Thursday night games, until next year! #francesbelle
“Play it again, play it again, play it again… “Play it again, play it again, play it again… “ 🎶
Raising ballers. 🏀 Raising ballers. 🏀
That’s a wrap on @artisticdanceexchange! Dorothy That’s a wrap on @artisticdanceexchange! Dorothy received a scholarship toward the national convention in Orlando this summer, and was invited to perform in the junior opening number. 

Long drives, early mornings, and endless hours taking residence in hotel lobbies with my fellow dance parents. We survived Convention month - on to Competition season!
Another weekend, another dance convention. 🩰 Do Another weekend, another dance convention. 🩰 Dorothy had a blast learning in the @activateyourartistry Pre-Pro level, dancing with middle schoolers. One more convention to go… this month. 😜
Follow on Instagram

Follow Me

  • Bloglovin
  • Instagram
  • LinkedIn
  • Pinterest
  • Twitter

Get $25 for Your Stitch Fix!

Stitch Fix

Categories

  • MY GIRLS
  • MOCO FIXER
  • STITCH FIX
Definitely not over the @iddancecomp photos from l Definitely not over the @iddancecomp photos from last weekend. 💜🕺
Just like that, Biddy Ball is over. 😢 We’re S Just like that, Biddy Ball is over. 😢 We’re SO proud of Frances for trying something new, developing as a player each week, and even scoring her first basket in the last minute of her last game! 🏀 We’ll miss our Tuesday and Thursday night games, until next year! #francesbelle
“Play it again, play it again, play it again… “Play it again, play it again, play it again… “ 🎶
Raising ballers. 🏀 Raising ballers. 🏀
That’s a wrap on @artisticdanceexchange! Dorothy That’s a wrap on @artisticdanceexchange! Dorothy received a scholarship toward the national convention in Orlando this summer, and was invited to perform in the junior opening number. 

Long drives, early mornings, and endless hours taking residence in hotel lobbies with my fellow dance parents. We survived Convention month - on to Competition season!
Another weekend, another dance convention. 🩰 Do Another weekend, another dance convention. 🩰 Dorothy had a blast learning in the @activateyourartistry Pre-Pro level, dancing with middle schoolers. One more convention to go… this month. 😜
Natural. Talent. 😂 #biddyball #basketball #funn Natural. Talent. 😂 #biddyball #basketball #funny
Day 1 of @shine_dance_convention! Intensives in Br Day 1 of @shine_dance_convention! Intensives in Broadway Jazz, Lyrical/Contemporary, Hip Hop, Jazz and Tap, plus a Masquerade Ball to end the night. 

We’re tired. 😅
Merry Christmas Eve from the Cotten sisters! ❄️ #dbunny #francesbelle
"Today’s special moments are tomorrow’s memori "Today’s special moments are tomorrow’s memories." —Genie, Aladdin 💙

Copyright © 2023 · Cotten Tales & Samantha Cotten


Loading Comments...